Comment

Upgrading an iMac

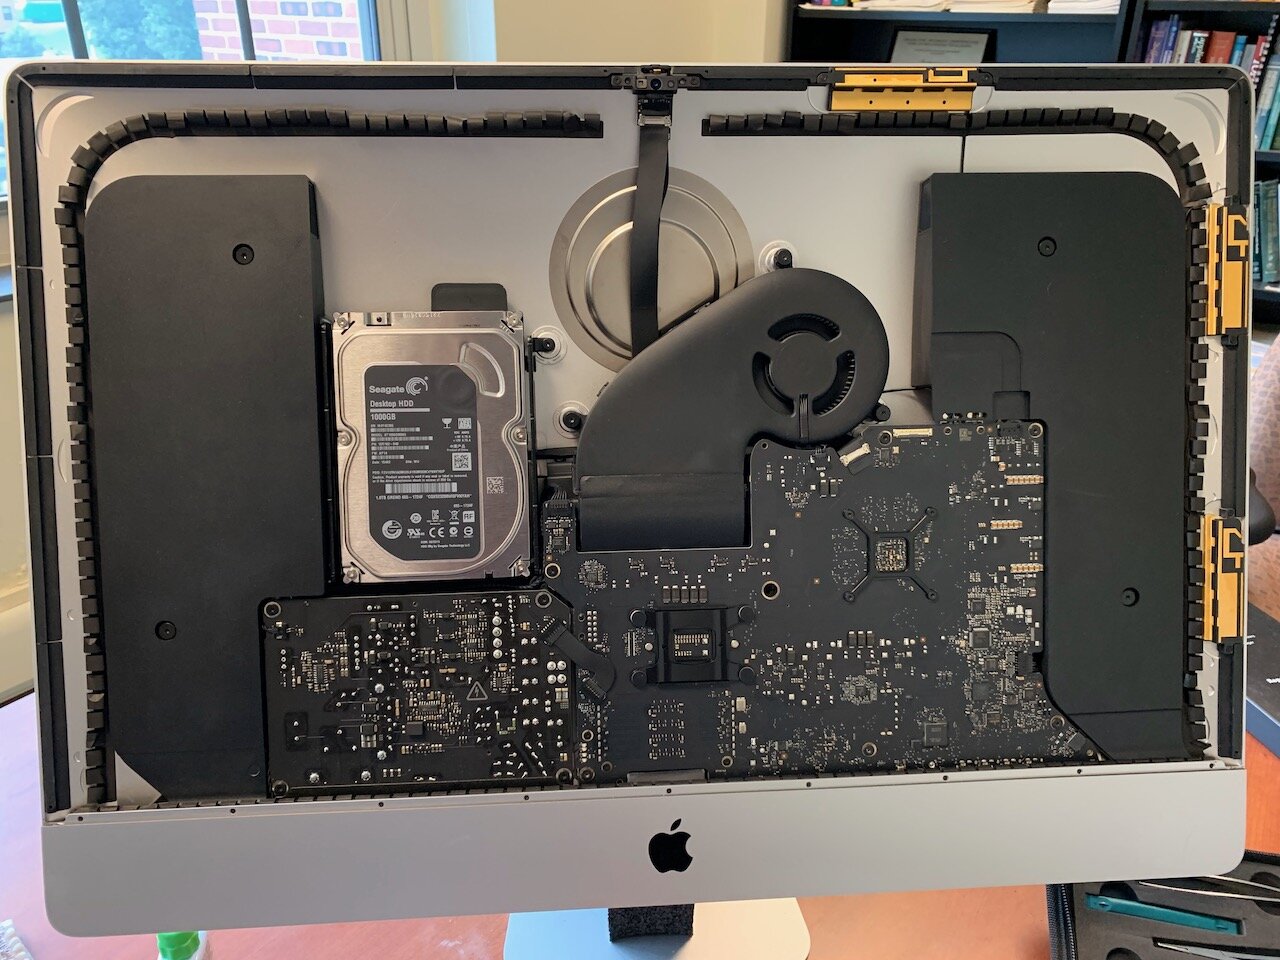
Late 2013 iMac 14,2 with screen removed.

Late 2013 iMac 14,2 with screen removed.

Emboldened by my success upgrading my 5th generation iPod and frustrated by the slowness of one of my iMac’s I decided to see what end user upgrades are available for post-2012 iMacs. Officially not much can be upgraded internally. The 27-inch iMac has a RAM hatch on the back which an end user can open to install up to 32GB of RAM (or more in more recent iMacs). I felt like the performance bottleneck in my Late 2013 iMac14,2 was the 1TB spinning mechanical hard disk. It seemed to take far too long to login and to start applications compared to my Late 2014 Retina 5K iMac15,1 with a 512GB SSD (more on that later). My first thought was that a thunderbolt-connected external drive enclosure with 4 SSDs in RAID 0 for speed or RAID 5 for speed an safety would help. Four-bay thunderbolt enclosures are expensive and the iMac14,2 only has thunderbolt 1 support. Even the iMac15,1 only has thunderbolt 2 support. I resisted as long as I could, but eventually I saw no way around cutting open the iMac14,2 and installing an NVMe blade SSD. Since I was going to be opening up the iMac14,2 I figured I might as well perform any other upgrades that could squeeze some more speed and life out of the computer. This meant upgrading the RAM (very easy) and upgrading the CPU (more challenging). For anyone who may be considering doing this type of upgrade themselves, I will give a list of online resources and the specifics of some of my experiences. There were a few surprises along the way.

My starting point for information on this type of upgrade/modification of iMacs was the topic “A list of successful iMac 27" (2012-2019) SSD upgrades” hosted in the forums on the MacRumors website. There I learned that it was possible to install an NVMe blade SSD (from a variety of manufacturers) though I would need a special adapter as the connectors on Apple’s iMac motherboard and Apple blade drive are a proprietary design (the page linked describes the adapter as being for a MacBook, but it also works in an iMac). These adapters are small enough to be mailed in a padded envelope, so try not to lose it once it arrives. If you are adding an Apple-branded blade drive to your iMac, you will not need the adapter. I decided to go with a 1TB DATARAM NVMe blade drive, thinking this would exactly replace the 1TB HDD that was the performance damper. The iMac14,2 already had 16GB of RAM, but I decided to upgrade it to the maximum of 32GB with this kit. Finally the base iMac14,2 came with an Intel 3.2 GHz Core i5 (I5-4570) Processor and the fastest CPU that was compatible with the iMac14,2 was the Intel Core i7 4771 (I7-4771) Processor. This would still be a 4-core processor, but now with a base clock of 3.5 GHz and with hyperthreading. I did buy a used one, since at the time, the prices of new ones were higher than I wanted to pay. Finally, in addition to the NVMe drive, the RAM, and the CPU there are a few other items people should have if they are planning to open up a post-2012 iMac.

  • Foam service wedge (not absolutely necessary, but you’ll probably be glad you have it).

  • Cleaner for removing thermal paste.

  • New thermal paste (if replacing the CPU).

  • Heat sink for NMVe drive (not absolutely necessary, but a good idea).

  • General servicing kit for iMac (contains most of the tools needed to open the iMac and remove the various components).

As a warm-up for people who have never worked on an iMac, upgraders should install the new RAM (which is very easy and does not require opening the iMac) following the instructions in the guide from Apple.

Two good resources for step-by-step instructions on opening an iMac are iFixit’s guide for replacing the CPU (the guide for replacing/installing the NVMe drive outlines nearly the same steps) and OWC’s video. One important disassembly step mentioned in the video at approximately 3:36, but absent from the guide (it would come right after step 24) is the removal of the nine small (really small!) screws holding a small metal strip in place behind the bottom of the screen. The small metal strip either blocks dust from being sucked in through the bottom of the iMac or is an RF shield. I found that when it was left in place, I could not remove the right speaker of the iMac. One other thing to be careful of is unplugging the four AirPort/Bluetooth antennas. The connectors are small and fragile. Pull them up perpendicularly from the logic board. Also the tool needed to remove the 20.8 mm T25 spacer screw mentioned in step 51 was not included in iMac servicing kit. I was able to find it at my local hardware store.

iMac15,1 with the Retina 5K screen removed.

iMac15,1 with the Retina 5K screen removed.

Antenna connectors for AirPort/Bluetooth module on logic board.

Antenna connectors for AirPort/Bluetooth module on logic board.

The first time (notice I said the first time) I opened the iMac it took about three hours to remove the various components, remove and clean the old CPU, apply thermal paste and install the new CPU, and install the adapter and NVMe drive. The image below shows the NVMe drive with the adapter and heat sink installed.

NVMe drive with heat sink and adapter.

NVMe drive with heat sink and adapter.

If you look closely, you can see that the retaining screw (upper right-hand side of the image) is tilted at a 45-degree angle. I noticed it at the time, but thought it was due to extra length of the drive provided by the adapter. I did not realize it was due to the fact that I had not seated the adapter and drive all the way in. After reassembling the iMac and discovering that the iMac booted but could not see the NVMe drive and then taking it apart again, I realized that the drive is not seated until it makes an audible and tactile click. Then everything was fine. I decided to leave the 1TB hard disk in place and followed these instructions to create a 2TB fusion drive. The end result was a very noticeably more responsive iMac14,2. I feel like I will be able to happily use it for a few more years.

Since the iMac14,2 turned out well, I decided to see what I could do for my Retina 5K iMac15,1. It already had the top CPU (4.0GHz Intel Core i7-4790K) and 32GB of RAM, so any upgrade would be limited to replacing the 512GB SSD with something larger. I could amortize the cost of the tools needed to dis/reassemble the iMac, so all I needed was a SATA SSD. I settled on a 2TB Mercury Electra 6G from OWC, thinking all I would need to do is open the iMac, unplug the 512GB stock SSD, plug in the new SSD, and restore the system from my most recent Time Machine backup. Off I went thinking this would be a 30-minute upgrade. Opening the iMac went smoothly, but right away I saw something unexpected, there was no SATA SSD in the drive bay, just empty space. I had checked the Apple Menu -> About This Mac -> System Report -> NVMExpress and saw no devices listed prior to opening the iMac15,1. Based on this information I had thought the iMac15,1 must contain a 512GB SATA SSD, when in reality it contained a 512GB Apple proprietary blade drive. Furthermore, since there was no SATA SSD, there was also no SATA cable for connecting a drive to data and power. One quick decision later and I was having shipped to me the proper cable, another adapter, and a 1TB Crucial NVMe blade drive. The NVMe blade drive would hold the OS, applications, and other supporting data with room to spare and the 2TB SATA SSD would house my home folder with room for years of new files. After installing everything, I did try to create a 3TB all SSD Fusion drive, but it did not work. Some people claim it will, but it seems that unless one of the two drives in the Fusion setup is substantially slower than the other, the Fusion process does not work.

So now I have two upgraded iMacs with lots is RAM, storage, and maxed out CPUs. I plan on using them for several more years. The next challenge I would like to take on is upgrading an iMac Pro, taking the base model all the way from an 8-core XEON CPU to the 18-core XEON and the RAM up to 512GB. Currently this project a way out of my budget, but perhaps in a few years.

Comment

Modernizing an iPod Classic

Comment

Modernizing an iPod Classic

In 2007 I bought an 80GB 5th generation (late 2006) iPod for my wife. She was beginning to travel a great deal for work and we thought an iPod would be a convenient way for her to carry music, podcasts, and (what seemed amazing at the time) videos. I believe this model iPod was even referred to as the video iPod. This iPod has the older style 30-pin USB cable and a 3.5mm headphone jack. She carried it on both domestic and international trips. I don’t recall the iPod having a dedicated charger, so we charged it by plugging it into either our laptop or desktop computers. The battery life was pretty good. Apple specs the battery at 20 hours music playback and 6.5 hours video playback, so we didn’t have to charge it everyday. Once we got our iPhones in 2008 we used the iPod less and less until it ended up in a drawer for years. Our last two cars have had iPod connectivity, so the iPod migrated to the cars for the last four years. Despite the heat and cold of the automotive environment and being nearly 12 years old, the iPod is still going strong. Lately though with iPhones being available with up to 512GB of storage, I wondered if the iPod classic could be upgraded. There is an active community of iPod mod-ers and a marketplace of available replacement and enhancement parts and tools for iPods. In this post I will describe my experience upgrading our iPod.

My first stop was an article on The Verge providing an overview of the process and links to vendors of replacement and upgrade parts and tools. From that site I knew I would need the proper tools to open the iPod, a replacement battery, and a replacement for the 80GB HDD. The battery and tools were available from iFixit. They really do a great job of helping you find the right battery for your model iPod. The tools to open the iPod are included with the order of the battery and the price was definitely right. I had been reading and seeing videos of people replacing the spinning HDD in an iPod with solid state memory. This lead me to purchase the iFlash-Quad from iFlash. The iFlash-Quad is a circuit board with four slots for microSD cards. Next I needed to purchase some microSD cards, but before doing so I double checked with the iFlash compatibility table to make sure our iPod could handle the memory I intended to install. Some models of the iPod classic can only address up to 128GB of storage for iTunes. I wanted to put 512GB of storage in ours, and fortunately our model can address all of it. I ordered four 128GB microSD cards from Amazon. It seems like 128GB is the pricing sweet spot for microSD cards. It would have been nice to go for 1 TB in the iPod, but the price differential was just too great.

With all the parts and tools in place. It was time to start. For a boost of confidence, I watched a couple more videos on YouTube on how to safely open an iPod classic.

Replacement and upgrade parts, tools, and the iPod Classic 5th generation 80GB.

Replacement and upgrade parts, tools, and the iPod Classic 5th generation 80GB.

The specs of the iPod before any modifications.

The specs of the iPod before any modifications.

The first step is to use the plastic pry tool to separate the steel back of the iPod from the plastic front. This has to be done carefully so as not to scratch the front. Take your time and slowly work the pry tool around all four edges of the iPod. Once you make one pass completely around the iPod the second (and maybe third) pass will be easier and you will be able to open the iPod like a book and remove the HDD.

The open iPod with original battery (cable disconnected) and the original 80GB HDD removed.

The open iPod with original battery (cable disconnected) and the original 80GB HDD removed.

The second step is to carefully pry the old battery from the steel iPod back, remembering to stay clear of all the ribbon cables. Once the old battery is out, the new battery takes its place. The replacement battery already had an adhesive strip on one side to secure it to the steel back of the iPod.

Replacement battery installed.

Replacement battery installed.

After the replacement battery was installed it was time to move on to upgrading the storage. Four 128GB microSD cards installed in the iFlash-Quad appears to the iPod as a 512GB HDD; however, it has no moving parts and weighs much less than the original 80GB HDD. Reconnecting the ribbon cable to the iFlash-Quad board was a little nerve racking as it was difficult to gauge how far the cable should be inserted in the connector. On the first try the cable immediately came loose. The second time I gently nudged the cable from a couple of different angles and positions to seat it. After closing the cable clamp it stayed in place.

The last step is to reconnect the battery’s ribbon cable. I crossed my fingers as I closed the back of the iPod (without pushing it all the way closed in case I needed to open it again to fix a problem). I pressed the home button on the front to see if anything would and got just the result I was hoping for.

This screen means the iPod is still alive and ready to be restored by connecting it to a computer and using iTunes.

This screen means the iPod is still alive and ready to be restored by connecting it to a computer and using iTunes.

Now I could press the steel back of the iPod firmly into place and connect the iPod to a computer and iTunes. The software recognized the iPod immediately but said that the HDD needed to be formatted and restored. After pressing the “Continue” button a few times and waiting about two hours for all the files to be copied over at USB 2.0 speed, we had our upgraded super-iPod 5th generation (late 2006) with 512GB of solid state storage, a new battery, and plenty of space for music, photos, and video.

The finished product, a 5th generation iPod Classic fully updated for 2018.

The finished product, a 5th generation iPod Classic fully updated for 2018.

Comment

Comment

Mid-century Modern Architecture in Columbus Indiana

While my wife was temporarily residing in Indiana for work, we made sure to explore some of the state on the weekends. We both appreciate modern architecture and art and heard about the collection of mid-century modern architecture in Columbus, IN. We highly recommend anyone with similar interests pay a visit to this city. The town motto is "Unexpected. Unforgettable." and I'd say it lives up to the motto. The link above to the city leads to plenty of information about the history of the city, but the short version connected to modern architecture starts with J. Irwin Miller, who led the Cummins Engine Company (now Cummins Inc.) after World War II. He wanted to encourage the construction of modern buildings in Columbus, so whenever public buildings (city and county government buildings, schools, churches, etc) were being planned, the Cummins Foundation would pay the architect fees as long as the client chose from a list of approved architects working in modern styles. This program has been very successful in bringing famous architects, artists, landscape architects, and interior designers to Columbus. The visitors' bureau offers architecture tours of the city (a two-hour introduction to the city). Some of our favorite sites are listed below.

The first item we saw after parking was a sculpture, Large Arch (1971) by Henry Moore.

IMG_1051.jpg

The Henry Moore sculpture sits next to the Bartholomew County Library designed by I.M. Pei.

The Columbus City Hall was designed by Edward Charles Bassett. It features an interesting pair of cantilevered brick walls which frame the stairs and semi-circular windows facing the street.

IMG_1054.jpg

Across the street from City Hall is the Bartholomew County Memorial for Veterans designed by landscape architect Michael Van Valkenburgh. The memorial features excerpts of letters from armed services members to their families.

IMG_1059.jpg

Some of the other interesting features of buildings in the city are the ventilation stacks of the AT&T Switching Station designed by Paul Kennon,

IMG_1121.jpg

and the landscape around the Cummins Corporate Office Building.

IMG_1110.jpg

Two of my favorite structures were designed by Eero Saarinen. One is the North Christian Church.

Probably the highlight of a visit to Columbus is a tour of the Miller House designed by Eero Saarinen with interior design by Alexander Girard and landscaping by Dan Kiley.

IMG_1174.jpg

If you are interested in more of the story of J. Irwin Miller and modern architecture in Columbus, Indiana you may want to visit the city or at least check out the following video for visitors.

Comment

Ten (or more) Things to Love About Houston

Comment

Ten (or more) Things to Love About Houston

It's been quite a while since I have updated this journal and I've been meaning to create this entry for months. I was fortunate enough to be awarded a one-year sabbatical from my university to complete the manuscript of a textbook (since completed). Since my wife was working on Houston, TX I naturally took the opportunity to spend a year with her in Houston. A year later the sabbatical is over and we have a list of things we came to love about living in Houston. This is an entirely personal list and completely unscientific. The list is not meant to be a put-down of other attractions in Houston or other cities. Let's get to it.

  • Hermann Park and the Miller Outdoor Theatre. The park is great for walking and running. There  are playgrounds for kids and water attractions. There is a Japanese garden section. The park plays host to numerous cultural and civic events year-round. Miller Outdoor Theatre hosts music, dance, plays, and movies from March through November each year and it is absolutely free! Theater-goers can brings blankets and/or lawn chairs to sit on the grassy hill under the stars, or if you are willing to line up for a limited number reserved seats under the roof (and ceiling fans), you can visit the box office at the theater between 10:30AM and 1:00PM on the days of performances for free tickets.


  • Diversity. Houston is the fourth largest city in the United States and is the home of people from many different cultures and other national origins. The Los Angeles Times calls Houston the most diverse city in the US. In the Museum District where we lived there were many people from all over the US, Europe, Latin America (especially Mexico), Africa, Asia, and the Middle East. The proximity of the Texas Medical Center brings people from all over the world for jobs as well as medical treatment.

  • The iPic Movie Theater. Normally we don't like to use this journal as free advertising for companies who can well afford an advertising campaign of their own. However, this list will contain the names of several companies, because they made our time in Houston so enjoyable. First up is the iPic, a premium movie theater experience. Power reclining seats (check), blankets (check), pillows (check), free popcorn (check), chair-side wait staff (check), excellent food (check), alcohol (we have a winner!). All for about the cost of ten movie tickets at most other theater chains. Yes, iPic is a chain. The first venue we visited was in Houston. Since then we have also visited the iPic in Bethesda, MD (sorry iPic Pike & Rose, the iPic Houston is nicer).
  • Rice University. What's not to like about a beautiful tree-lined campus with wonderful architecture and modern sculptures, spirited sports teams, a diverse student body, excellent academic reputation, and a wonderful library? The library provided valuable resources while I worked on the textbook during the sabbatical. Rice's football stadium is also the spot where Pres. John F. Kennedy gave his "moon shot" speech. The podium he used during the speech is on display in the Fondren Library.


  • Food. Houston is the home of over one thousand restaurants. We didn't eat at all of them, because we found three we absolutely loved. The first was Danton's Gulf Coast Seafood Kitchen, a fabulous seafood restaurant in our neighborhood. If you find yourself in the Museum District hungry for raw oysters, you can't go wrong stopping at Danton's. Taking a walk in Hermann Park? Check the parking lot of the McGovern Centennial Garden for the No Mi Street food truck. They will sell you the best Vietnamese/Latin fusion burgers and tacos in town. After 9PM and hungry for toro? Try MF Sushi, but check your bank account first as it is pricey, especially if you order alcohol.
  • Museums. Besides high-rise condominiums and apartments what does the Museum District have? The best thing is that many of the museums we liked the best did not charge an admission fee. These include the Contemporary Arts Museum (whose exhibits change fairly frequently, 3-4 times per year), the Menil Collection (art making you hungry? try the Bistro Menil across the street), and the Rothko Chapel. The latter is amazing (if you like Rothko's art). The chapel is a medium-sized open space with benches for seats and pillows for people who prefer to sit on the floor. Large Rothko paintings in deep purples and blacks surround you on all sides. The chapel is open everyday for contemplation and meditation (it's also the perfect spot to get away from the Houston heat and humidity if you are walking to the Menil Collection).
  • Sports. Houston has three big professional teams: 2017 World Series of Baseball Champion Astros, the Texans (football), and the Rockets (basketball). The sporting venues are easy to reach using the light rail. The Super Bowl was played in February 2017 and that brought a great deal of excitement to the city. We didn't get to see the game in NRG Stadium but we watched from a nearby sports bar (come on Atlanta Falcons, you couldn't win that one?) Looking for professional hockey in Houston? Keep looking. If you are in Houston during March, be sure to check out the Houston Rodeo, part state fair, part agricultural exhibit, part food extravaganza, part rock concert, and of course the rodeo. There is a even a public golf course and driving range in Hermann Park (but golf being an "activity" rather than a "sport" belongs in another category).

Comment

Comment

Ripping DVDs and Blu-rays under macOS

Since the late 1990's I have been given or bought about 200 DVDs and Blu-ray disks. For awhile they occupied shelf space in the media room, but with the convergence of computers, smart phones, tablets, and televisions, I decided to rip all the titles into a format which could be stored on a network attached storage device (NAS) and then streamed to any device capable of playing the title. Such a project requires some planning and some hardware and some software. There are a great many guides and how-tos published on the internet describing different techniques for accomplishing this task, but I wanted to summarize how I have approached this project and describe the hardware and software used. This guide is slanted toward Apple computers and macOS Sierra. I have been a big fan of open source and free software since my Linux days, so whenever possible I will turn to free software (as the reader will see, that is not always possible). I will also try to use utilities already present in macOS (technically though, you did pay for those when you bought the Mac). Given my Linux background this guide assumes the reader is comfortable issuing commands from the command line - if not, tread carefully.

First off you will need a DVD or Blu-ray reader which you can connect to your Apple computer. If your computer does not have an internal DVD/Blu-ray drive (and face it, most Macs have not had them since 2013), do a little searching on the web and you will find lots of external drives which can be connected via USB. I ended up buying a Blu-ray disk reader which also reads (and writes, though that is irrelevant to this project) DVDs. By default when a DVD is inserted, macOS automatically mounts the DVD as a volume and launches the DVD Player application which goes into full-screen mode. Press the esc-key to leave full-screen mode and press the command-q key combination to quit the DVD Player. When a Blu-ray disk is inserted, the disk is mounted as a volume, but no player starts since there is no native macOS Blu-ray player application (at least not one that Apple supplies with macOS Sierra).

Everyone has their own preferred workflow, and I am no exception. I prefer to make a copy of each DVD on the computer's hard-disk drive. Since I have only one DVD/Blu-ray drive, I can only work with one DVD/Blu-ray disk at a time. However, some software can work with multiple disks at the same time (for example the ripper Handbrake to be explained later). If multiple DVDs are stored as images on the hard-disk, I overcome the one drive limitation. On the other hand I do not make images from Blu-ray disks due to their size (25-50GBs), though as hard-disk drive capacities increase in the future, this will be less of an issue. While I'm no lawyer, I think I'm on safe legal ground as long as I do not create physical copies of DVDs or Blu-rays and do not share these disk images with anyone else. Both of the DVD rippers mentioned later can work with a DVD disk directly, so creating an image of the DVD is not strictly necessary. Once the conversion to an MP4 file is completed the disk images can be deleted.

Creating a Disk Image from a DVD

To make a disk image of a DVD (which for a typical movie will occupy between 4 and 8GB) you can issue the following commands from the command line in the Terminal application. Assuming the Terminal is open and active, first check to see which device is associated with the DVD.

bob$ diskutil list
/dev/disk3 (external, physical):
   #:                       TYPE NAME                    SIZE       IDENTIFIER
   0:                            SOPRANOS_S1_D3         *8.2 GB     disk3

bob$

The "diskutil list" command reveals that the DVD (in this case the third disk of the first season of The Sopranos) is mounted as device "/dev/disk3". Before this disk can be copied it must be unmounted (but not ejected). Again in the Terminal issue the following command.

bob$ diskutil unmount /dev/disk3
Volume SOPRANOS_S1_D3 on disk3 unmounted
bob$

Now the DVD can be copied to an ISO format file on the computer's HDD or SSD. Enter the following command.

bob$ dd if=/dev/disk3 of=The\ Sopranos\ S01D03.iso bs=1m
7411+1 records in
7411+1 records out
7771576320 bytes transferred in 2486.554478 secs (3125440 bytes/sec)
bob$

The command "dd" is a very old UNIX command used for copying data from a source to a destination. Note that the output file name "The Sopranos S01D03.iso" has its spaces escaped with backslashes so that the spaces will not be parsed as separate arguments to the dd command. It is a fairly bare bones command and doesn't do much error checking, so if your DVD is dirty, damaged, or scratched this command may fail with an error message. Later I will discuss a commercial software solution which sometimes works on such disks. This command can take from 20-60 minutes to complete, largely dependent on the read speed of the DVD drive. Once the command completes, the DVD can be ejected.

bob$ diskutil eject /dev/disk3
Disk /dev/disk3 ejected
bob$

This process can be repeated for as many DVDs as you need to copy.

Creating a MP4 file of a Movie DVD

I typically use one of two applications for this purpose. Handbrake is a free application which is fairly easy to use and can queue several DVDs or DVD disk images to be processed serially. My alternative application (not free) is MacX DVD Ripper Pro. Rather than explaining the two applications here, I refer the reader to the home pages for these two applications. In general Handbrake is the faster converter for me (typically processing 100+ frames per second). By contrast MacX DVD Ripper Pro is very slow, almost never able to process video in real time (in other words slower than 24 frames per second). Why have two applications which do the same thing? Occasionally I run across a dirty or scratched DVD which the command "dd" cannot copy or the copy has an error in it which causes Handbrake to fail and output a truncated file. For these difficult cases, I find the error correction software in MacX DVD Ripper Pro is usually able to render a useful MP4 file or disk image, though it may take overnight to complete.

Creating MP4 files of Television Shows

Usually a DVD pack for a season of a TV show will contain two or more disks and each disk may contain two or more episodes of the TV show. Even though it is slower, I prefer to use MacX DVD Ripper Pro for ripping TV shows since its user interface allows you to easily see which tracks on the DVD contain episodes (an hour-long drama will be a 50-52 minute track while a half-hour situation comedy will be a 19-21 minute track). Handbrake can do this too, I just find it more difficult to select the tracks I want in Handbrake.

Creating MP4 files of Movie or TV Show Blu-rays

The process I use for Blu-ray disks is a little different and more frustrating. As mentioned earlier Blu-rays typically contain so much data, that I do not make disk images of them. MacX DVD Ripper Pro will not take a Blu-ray disk as input, which leaves Handbrake which likewise does not directly access Blu-ray disks. However there is an article which describes how to get Handbrake to rip Blu-ray disks if you have another free media player (VLC) installed. Instead my preference is to copy some (but usually not all) of the tracks off of a Blu-ray disk and save the information in a MKV container on the computer's hard drive. The software I use to accomplish this is MakeMKV. While this application has a hard job to do and does it well, I have a few complaints about it. First, its user interface is not as polished and Mac-like as MacX DVD Ripper Pro or Handbrake. This is probably due to the fact that the application was originally developed for Windows (or possibly Linux) and then ported to macOS and the UI was kept (nearly) the same. My second complaint is that the application purports to be free while in beta-testing or you can pay $50US to own the application (and receive free lifetime upgrades) and support the developer. What I found when trying to use the free beta, is that the application would refuse to run saying that it was too old or the application key had expired. A little internet searching can find the latest beta software key and even more searching will reveal where to store the key; however, the keys expire monthly. Thus unless you plan on using MakeMKV frequently, plan on installing a new key almost every time you want to rip a Blu-ray disk. Even when you have a valid key, sometimes the application refuses to run unless you download the latest version. What's a person to do? Pay the $50 and support the developer and forget about expiring software keys.

Long story short, use MakeMKV to copy the desired tracks off a Blu-ray disk and then use Handbrake to convert this file to a playable MP4 file.

Streaming Stored Content in the macOS/iOS Ecosystem

This section describes an optional piece of hardware. If you have a computer with a large hard drive and don't mind leaving the computer on and connected to the internet all the time, you will not need as network attached storage device. Just download the free Plex media server software and configure it. The Plex server software will serve up video, audio, and image files to the Plex client application which is available for all the recent macOS and iOS devices. With some extra effort, the Plex client application can even be installed on legacy Apple devices (Google is your friend). If you have an older computer sitting around and a USB-connected external drive, this can make a capable media server using Plex.

I wanted something a little neater because I have been down the road of a little Intel Atom-powered box with multiple octopus-like tentacles of external USB drives. The most frustrating thing became finding enough outlets to plug in all the AC adapters (why is it that an 8-outlet power strip can only fit two wall warts?). Moving all the devices from one room to the next or one house to the next was a headache too. I decided I wanted an all-in-one box, a network attached storage device. These are basically small computers (mine is still based on a quad core Intel Atom processor) running some flavor of Linux (usually) with multiple bays for installing hard drives (or solid state drives if you are rich). I bought an 8-bay model capable of running the Plex server application and other similar media servers. I loaded it up with four 8TB drives configured as a RAID-5 array. One power cord, one ethernet cable, and everything works fine. I have streamed video, audio, and photos to my smartphone, laptop, and desktop. This setup even allowed me to watch a movie on my smartphone connected to WiFi in Europe.

Comment

1 Comment

Operant Conditioning (or training a cat)

As an undergraduate, despite majoring in physics and taking a great many mathematics courses, I always found the subject of psychology interesting. Of particular interest were the different branches of psychological thought (personality, social, cognitive, etc.). One branch which catches many people's attention is behavioral psychology epitomized by the research of B.F. Skinner (Burrhus Frederic Skinner, possibly the coolest first name ever). Skinner is considered the founder of the behavioral theory known as operant conditioning. Skinner's theory was that animal (including human) behavior is shaped by reinforcers. Behavior that receives reinforcement becomes more frequent while behavior that is not reinforced dies out. Reinforcements can be divided into four categories:

  • Positive reinforcement: increases the frequency of a behavior by giving the subject a wanted reward when the behavior is exhibited.
  • Negative reinforcement: increases the frequency of a behavior by removing an adverse stimulus from the individual's environment.
  • Positive punishment: decreases the frequency of a behavior by imposing an adverse stimulus or event in response to the behavior.
  • Negative punishment: decreases the frequency of a behavior by removing a stimulus desired by the individual.

Flash forward from college to now when we have an absolutely lovely cat (see below) with one annoying habit. He prefers to urinate beside the litter box rather than in it. We have consulted with veterinarians for a physical cause, changed the litter used, the box, the location of the box, the number of boxes. Nothing worked and the behavior persisted. Punishment did not seem to be the solution to this habit, because I do not think the cat would know why he was being punished. Just before the winter holidays my wife suggested that we try positive reinforcement in order to change his behavior. Finally my study of behavioral theory would pay off. When the cat urinates in the litter box (we must witness the occurrence) he gets one cat treat. A couple of cat treats per day is not going to ruin his diet. It worked! Within a few days, he urinates exclusively in the litter box. Now we do not have to place puppy training pads around the litter box.

Of course there have been a few amusing unintended consequences of this behavioral modification technique.

  • At first the cat though he was being rewarded for standing in the litter box and would get in the box and do nothing whenever we came near it. He still expected a treat (which he would not get).
  • The cat waits until we return home to urinate and announces it with soft meows.
  • When he cannot wait any longer to urinate (for instance if we have been out for several hours), the cat will try to fool use by getting in the litter box to re-cover an existing urine spot.

Lest anyone think we are cheating the cat on his treats, intermittent positive reinforcement is thought to be more effective than regular positive reinforcement. Just ask anyone with a gambling problem. If you have a pet exhibiting an unwanted behavior, try a little positive reinforcement. The solution to your problem may be easier than you think.

Falco enjoying his favorite sunbeam.

Falco enjoying his favorite sunbeam.

1 Comment

Comment

Sunrise and Sunset in Houston, TX

The view of the downtown Houston TX skyline provides amazing visual transitions during dusk and dawn. In the two videos below (filmed as time lapse videos during late January 2017), the colors of the sky are reflected in the faces of the buildings of downtown. There was a thunderstorm taking place during the sunrise video, and thus a couple of lightning flashes illuminate that clip.

Comment

Comment

Christmas in Terlingua, Texas

View of the Casa Buena Vista and Terlingua Ghost Town.

View of the Casa Buena Vista and Terlingua Ghost Town.

For the holidays we decided to leave Houston for west Texas, which I must admit is very different from Houston. The area we were in was near the Chisos Mountains, while Houston is very flat. Houston is the fourth largest city in the United States and as such has its fair share of noise generated by traffic and ubiquitous construction, while Terlingua Ghost Town was very quiet (well, I guess it is a ghost town). Once we picked up our keys for the Casa Buena Vista and checked in, I realized I could hear the flap of birds' wings as they flew past the house. I could hear animals called javelinas in the brush near the house. The house was left from the early part of the twentieth century when Terlingua was a quicksilver (mercury) mining town. The house has now been converted into lodging for tourists. The interior of the house is rustic and decorated in a blend of southwestern styles, religious iconography, and Oaxacan handicrafts. The house has a full kitchen, two bedrooms, gas log fireplace, air conditioning, and screened-in porch. It was very comfortable. The first three days we were there the temperature was in the 60-80F (15.6-26.7C) range. The fourth day was windy but comfortable, but overnight a rare snowfall blew in and temperatures dropped below freezing. Nevertheless we were very comfortable next to the fireplace and there were space heaters for the rest of the house.

Old car covered in snow in front of the Starlight Theater.

Old car covered in snow in front of the Starlight Theater.

If you want to visit west Texas, particularly Terlingua, don't worry about being too isolated or cut off. There is cellular telephone service and our lodging had wi-fi. For people that don't feel like cooking the Starlight Theater (don't let the name fool you, it's a restaurant with live entertainment in an old theater) is nearby and Espresso ... y Poco Mas serves breakfast and lunch. For us one of the best things about staying at the Casa Buena Vista was walking to the top of the hill behind the house to watch the sun go down and the moon rise (there was a full moon on Christmas in 2015).

Comment

1 Comment

Another Hero Gone

The world awoke to the sad news today of the passing of David Bowie. Everyone hearing this news reacts in their own, individual way, for David Bowie and his art mean different things to different people. While I was a fan of lots of artists (when I had time to listen to music for pleasure), he was always a favorite. By the time I graduated from college, I had almost all of his mainstream albums (on vinyl!). I was fortunate enough to see him perform live in 1983 on his Serious Moonlight Tour. My vinyl LP collection is long gone now, but fortunately most of it has been duplicated in digital formats. Hearing of his death this morning brought on a melancholy I've felt at the passing of other people I have admired. While I don't have the ability to adequately memorialize these individuals, this post should serve as a portal to proper memorials for a few of my heroes.

The clip embedded below fits with how I sometimes remember David Bowie, as musician, artist, fashion judge, and just all 'round super cool guy.

Scene from Zoolander. I do not own this movie. All rights reserved to their respective holders.

What other losses of people I never met have made me as sad?

Drawing from some of the most pivotal points in his life, Steve Jobs, chief executive officer and co-founder of Apple Computer and of Pixar Animation Studios, urged graduates to pursue their dreams and see the opportunities in life's setbacks -- including death itself -- at the university's 114th Commencement on June 12, 2005.

Uploaded by SpaceTimeExplorer on 2013-11-12.

Now it's time to get on with life, honor them by trying to make the world a better place, and listen to some of the greatest music I've ever heard.

1 Comment

Comment

A Few Days in Big Bend National Park

Over Christmas we headed out to Big Bend National Park in west Texas. Big Bend is a large park bordered by the Rio Grande River and Mexico on the south. The park contains numerous mountains and other peaks, none Rocky Mountain sized, but some higher than anything on the eastern side of the US (see Mount Mitchell (6684 feet, 2037 m)). Since it was technically winter (though 60-80 degrees Fahrenheit) it was a good time to hike in the park. Two hikes others may be interested in taking are the Emory Peak (7825 feet, 2385 m) trail and the South Rim trail. Depending on where you read about these hikes they are described as either moderate or strenuous. I lean toward moderate, since we saw people of all ages and fitness levels on the trails (though not all moving at the same pace) with a great deal of determination to complete the hikes. The easiest way to begin both hikes is at the Chisos Basin Visitors Center in Big Bend National Park. All the trails in the park are very well marked and well maintained. To get to Emory Peak, follow the Pinnacles Trail to the Emory Peak trail. Over the 5.1 miles (8.2 km) to the peak you will ascend approximately 2500 feet (762 m). The last 25 feet (8 m) to the top are a scramble up rocks. The climb does not require any rock climbing gear, but hikers should be very careful. The round trip should take 4-5 hours depending on how many stops you make. The South Rim hike is more of a loop. Again you can start at the Chisos Basin Visitors Center, take the Pinnacles Trail to Boot Canyon Trail to the South Rim Trail and return to the visitors center via the Laguna Meadows Trail. The signs state this is a 12.1 mile (19.5 km) loop, but we felt it was closer to 13 miles (20.9 km). Over the course of the loop hikers will ascend (and descend) 2000 feet (610 m). The map fragment shows highlights the Pinnacles and Emory Peak trails in purple and the South Rim loop in yellow.

BigBendMap.jpg
A view from the top of Emory Peak.

A view from the top of Emory Peak.

The South Rim overlooking the Rio Grande River and Mexico.

The South Rim overlooking the Rio Grande River and Mexico.

Comment

Comment

Walk Across San Francisco

It's been awhile since I've had time to post anything. The second half of the fall semester was busy with classes, presentations, and preparing for the SOA Exam FM/2 (and passing it!). Despite the lateness of this entry, it will be in time for anyone planning a spring trip to San Francisco, CA. For fall break my wife and I traveled to SF for four days. While there is simply too much to do in only four days and too much to describe in a single posting, I wanted to describe a nice way to spend the day outside if anyone is in the mood for a long walk and some site seeing.

Our walk started in Chinatown along Columbus Avenue. It was the day of the 2015 Nike Women's Half Marathon and thus many streets were closed to automobile traffic which made walking easier. Taking Columbus Avenue all the way to the water brought us to Aquatic Beach Park.

From Aquatic Beach Park we walked across Fort Mason to Marina Blvd and along Crissy Field toward the Golden Gate Bridge. Along the way we found the Warming Hut, which is a great place to get a coffee or other refreshments. After the Warming Hut we continued up the paved and gravel paths to the Golden Gate Bridge Pavilion. At that point it was a straight walk across the Golden Gate Bridge. At the far end of the bridge is a tourist rest stop, the H. Dana Bowers Memorial Vista Point. Even if you are tired of walking at this point, it may be best to continue on to Sausalito, CA. In Sausalito there are many great restaurants with views of the water, coffee shops, ice cream parlors, wine tastings, jewelry stores, and art galleries.

If you need to return to San Francisco from Sausalito, you will have several choices, city buses, cabs, Uber, but perhaps best of all may be a bay ferry. Along the way the ferry passes very close to Alcatraz and even slows down for photos of the island.


Comment

Comment

Income Inequality

As the 2016 presidential election season draws closer, one topic which will receive attention is income inequality. A fairly simple metric of income inequality is the Gini index, which is a rich and meaningful source of data and skill building exercises for students of mathematics and economics. The Gini index is a number which can be derived from a Lorenz curve. A Lorenz curve, typically denoted L(x), represents the cumulative fraction of total income earned by the bottom fraction x of income earners. Both x and L(x) are expressed as fractions in the interval [0, 1]. If everyone earned the same amount (complete income equality) then L(x) = x. In no country on earth does this income equality exist; however, some countries have more equality than others. In the case of almost all nations the Lorenz curve resembles generically the one shown below. The Lorenz curve for the US for 1989 looks like this.

Lorenz curve for US for 1989 (source).

Lorenz curve for US for 1989 (source).

The Gini index of income inequality is calculated as twice the area between the diagonal line defined as y = x and the Lorenz curve L(x). Thus the Gini index of a nation with complete income equality would be 0 and at the other extreme the Gini index of a nation with complete income inequality would be 1. The closer to 0 the Gini index is for a country, the more income equality that country has. The closer to 1 the Gini index is for a country, the more income inequality exists in that country. For instructors and students in calculus, calculation of the Gini index is a real-world example of the application of the definite integral. For instructors and students in numerical analysis, mathematical modeling, statistics, developing the Lorenz curve and Gini index from raw data is a nontrivial exercise in curve fitting. So where does the US rank in terms of income inequality? Namibia and South Africa are among the most inequitable countries in terms of income distribution (Gini indices of 0.707 and 0.650 respectively). Sweden and Denmark are at the top of a ranking of countries according the income equality (Gini indices of 0.230 and 0.240 respectively). The US is near the middle (Gini index 0.480) keeping company with China (0.470) and Russia (0.415). However, income inequality has been on the rise in the US since at least the late 1960's (the oldest data I was able to access online easily). A year by year plot of the US Gini index from 1967 to 2014 is shown below.

A measure of historical income inequality in the US (source).

A measure of historical income inequality in the US (source).

References

  • C. Gini, Variabilita e mutabilita, Gini, C. (1912), C. Cuppini, Bologna, 1912; reprinted in Memorie di metodologica statistica (Edited by E. Pizetti, T. Salvemini), Libreria Eredi Virgilio Veschi, Rome, 1955.

  • C. Gini, Sulla misura della concentrazione e della variabilita dei caratteri, Atti del R. Istituto Veneto di Scienze, Lettere e Arti LXXIII parte II (1914) 1203–1248; reprinted in English: On the Measurement of Concentration and Variability of Characters, Metron LXIII (2005) 3–38, available online.

  • T. Jantzen and K. Volpert, On the Mathematics of Income Inequality: Splitting the Gini Index in Two, American Mathematical Monthly, Vol. 119, no. 10 (2012) 824-837, available online.

  • M.O. Lorenz, Methods of measuring the concentration of wealth, Publications of the American Statistical Association, Vol. 9 New Series, no. 70 (1905) 209–219, available online.

Comment

Comment

End of the Summer -- Campechana Time

Campechana and crackers.

Campechana and crackers.

One pleasant discovery made in Houston is the appetizer known as campechana. Some people may know this as a chilled Mexican seafood soup. I had never heard of it before moving to Houston, though undoubtedly it must be well known in some parts of the world. If you have never seen it or eaten it, campechana is like a cross between ceviche and gazspacho. Restaurants will charge an arm and leg for it, but it is cheap and easy to make a large batch for yourself. Before you make a large batch, you may want to ask yourself if you are willing to eat campechana for several meals in a row or if you are going to have the help of family and/or friends to consume it. If not, adjust the amount you make. Googling "campechana" will reveal many variations on the recipe, but don't feel as if you must follow any particular recipe slavishly. Campechana is one of those dishes that adapts well to your favorite ingredients and in whatever proportions you like. I am making a batch today and for the benefit of people wanting to make it themselves, I'll list the ingredients I use. Feel free to substitute or omit according to your tastes (especially if you have any shellfish allergies).

  1. Cherry tomatos (chopped into quarters)
  2. Chopped cilantro (use fresh, not dried)
  3. Chopped cucumber (thin slices quartered)
  4. Boiled, shelled, and de-veined shrimp (small to medium sized, about a half pound)
  5. Crab meat (or krab meat [but what would you do that to yourself?], about a half pound)
  6. Seafood cocktail sauce for flavor (the tomato-based kind with horseradish)
  7. Ketchup for flavor and color (doesn't take much)
  8. Minced garlic
  9. Juice of two limes
  10. Chopped onion (scallions are fine)
  11. Chopped jalapeño peppers (for some heat)
  12. Salt and pepper to taste
  13. Chopped avocado (add it just before serving, otherwise the avocado will turn dark brown and doesn't look very appetizing)

After mixing the first 11 ingredients together, the mixture can be covered and refrigerated and will be edible for a couple of days. Serve campechana with pita chips or some other sturdy chip. It is also good eaten as a cold soup and can be used almost anywhere you would use salsa (for example on scrambled eggs the next morning). We hope you enjoy it.

Comment

Comment

Art and Creativity

On July 23, 2015 I had the opportunity to view the exhibit In Living Color: Andy Warhol and Contemporary Printmaking at the Tampa Museum of Art. As a preface to this entry (actually my second draft since the first disappeared into the internet), I wish to make a few things known.

  • I have never studied art formally or academically. I am a frequent viewer of art where I encounter it and frequent museum visitor, but have never undertaken a scholarly study of art. My artist friend Bob Lyon, once said to me in response to my statement that in art I know what I like, "and you like what you know."
  • I have always been a fan of Andy Warhol's art, though not a fan of his films.
  • For the past two years I have attempted to create my own examples of art (images) in order to have something enjoyable to look at on the wall. Many examples of my images are collected in the gallery of this website. Some physical examples are in the hands of a few friends and relatives, but most hang on the walls of our apartments in Pennsylvania and Texas.

A couple of statements printed in a section of the exhibit catalog resonated with me. In the section by Karin Campbell (Joslyn Art Museum) the statement "I like boring things." attributed to Andy Warhol is repeated. Assuming the word "boring" is used as an adjective and not as a gerund, then my images contain a bit of the boring as well. Many of my images contain repeated elements which may bore some viewers, but I find comfort and enjoyment in repetition. For me this even extends to the music created by Philip Glass (one of my favorite composers), whose repeated patterns in music may bore (or even actively irritate) some listeners, but which I find pleasing. Who doesn't have a favorite film that they can watch over and over? The second statement is the assertion that the Pop Artists "endeavored to eradicate the notion of the 'genius artist' and to downplay the role of originality in art, adopting mechanical means of generating images". Without being in the inner circle of Pop Artists I find myself operating in the same way, often not my choice, but by circumstance. I write computer codes that when executed, generate images. This is a mechanical process. Almost all of my created images are inspired by (or copied from) other examples of art I encounter. Since it is the computer code and the computer which manifest the art, it is easy to generate similar images employing different color palettes, or to use randomness to generate families of similar images. In this way I don't hear the descriptors "boring" and "mechanical" as negatives when thinking about the images I create.

I also enjoyed the art of other artists included in the In Living Color exhibit.

Here is my homage to Josef Albers' Homage to the Square.

Here is my homage to Josef Albers' Homage to the Square.

A sculpture in front of the Fifth Third Bank in Tampa and my take on it.

Comment

2 Comments

MathJax within Desire2Learn

As a mathematician and educator, I find it convenient to use TeX/LaTeX for creating article manuscripts, books, tests and homework assignments, and classroom materials (using Beamer). Increasingly I have been using the Desire2Learn (or D2L for short, though the name seems to be changing to Brightspace) course management system in association with my teaching assignments. D2L enables me to upload formatted mathematics in PDF files which the students will see rendered using the built-in PDF viewer of D2L. However, if I were to develop online courses (as opposed to online ancillary resources to face-to-face classes) it might be nice to render mathematics within HTML pages created within D2L. This has the advantage of allowing the instructor to see directly what the students will see when they visit the page. The MathJax project makes this possible. I recommend anyone interested in MathJax read the excellent online documentation and see their examples. If you want to jump right in and live dangerously, create a file in a D2L course shell, click on the "HTML Source Editor" icon which may resemble </> and insert the following lines between the tags <head> and </head>:

<script type="text/x-mathjax-config">
  MathJax.Hub.Config({tex2jax: {inlineMath: [['$','$'], ['\\(','\\)']],
    processEscapes: true}});
</script>
<script type="text/x-mathjax-config">
MathJax.Hub.Config({
  TeX: { equationNumbers: { autoNumber: "AMS" } }
});
</script>
<script type="text/javascript"
  src="https://cdn.mathjax.org/mathjax/latest/MathJax.js?config=TeX-AMS-MML_HTMLorMML">
</script>

Only the last Javascript script is required. The first two enable the use of the dollar sign $...$ for inline mathematics and enable automatic equation numbering just as in LaTeX. A literal dollar sign may be escaped (\$) as in TeX/LaTeX. The only tricky part is remembering that you will create the page in the HTML Source Editor rather than in the D2L edit window. I have found that you can create just the mathematics portion on the HTML Source Editor, close that editor, and then create the rest of the text on the page in D2L's file editor window. The results are not perfect (for example, using the defaults the formatted mathematics has a font size approximately 20% larger than the surrounding text) but probably good enough for online work. If anyone has suggestions for improving the output of MathJax under D2L, please leave a comment.

2 Comments

1 Comment

Insects versus Arachnids in Austin

We were fortunate enough to get away to Austin, TX over the holiday weekend and saw at least one natural phenomenon that heretofore we had only seen on television. While walking to dinner we came upon two creatures, one was a tarantula (theraphosidae) of the genus aphonopelma. The other was a tarantula wasp (some locals call them tarantula hawks) which is a member of genera hemipepsis. This was the first tarantula we had ever seen outside of a zoo or pet store. It was large enough to command respect. The tarantula hawk is also a big insect (fun fact: it is the state insect of New Mexico). What made it interesting to happen upon them together is the two animals' relationship to one another. The tarantula hawk stings the tarantula, drags it to a burrow, lays a single egg on the abdomen of the spider, and seals the burrow (video available). Once the egg hatches, the larva enters the body of the tarantula to feed on non-vital tissues in the spider for as long as possible (that's not a great comfort to the spider, I presume) before pupating. I'm surprised I haven't had nightmares about this yet.

On another day we noticed a spider cocooning a dragonfly. Not being an expert on insects and arachnids, I cannot positively identify the type of spider (possibly one of several kinds of garden spiders or orb weaver spiders in TX) or the dragonfly. The dragonfly was not going to get away and the spider looked like it had a juicy meal. So over the weekend it looks like the score is arachnids 1 and insects 1.

1 Comment

Comment

Saturday Night Thunderstorm

Last Saturday a thunderstorm occurred north of Houston, TX. A one-minute video captured from the storm is embedded below. The audio has been processed to only 25% of the sound pressure levels recorded. Nothing much is lost since there is mainly only the sound of wind and ambient traffic noise. What was different about this type of storm was the frequency of lightning and the appearance that the ribbons of lightning seems to jump from cloud to cloud, rarely connecting with the ground. The video shows the frequency of lightning in real time. There was no audible thunder to accompany the bolts. This is the type of of lightning that we used to call heat lightning

Comment

Comment

Derelict

The Space Jockey's (Engineer's) ship seen near the beginning of&nbsp;Alien.

The Space Jockey's (Engineer's) ship seen near the beginning of Alien.

For years the satirical outlet The Onion has entertained me. Once they went online I also became a fan of The A.V. Club (which as I recall used to be a movie/television/music review page stuffed in the middle of the printed version of The Onion newspaper). One of the regular features of The A.V. Club is Great Job, Internet! where the editors post about interesting finds on the World Wide Web. On June 11, 2015 they posted an article and embedded video entitled Derelict, an edit of the films Alien and Prometheus by Job Willins and hosted on Vimeo. Luckily I watched the video yesterday because today it has been taken down (Even at that, it was difficult to see the video. A search of Vimeo app on the Apple TV didn't turn up anything. Fortunately the embedded video at The AV Club worked, but even that has been taken down now.)

For readers who have not seen one or both of Alien or Prometheus the remainder of this article may contain spoilers (Darth Vader is Luke Skywalker's father) and you should stop reading now.

What Job Willins has done is edited and intercut the two films into a single 2.5 hour story. Both films have been converted to black and white. Alien is one of my favorite films, though I found it really difficult to watch Kane's (John Hurtchestburster scene until it was later parodied in Spaceballs. Mr. Willins mentions how both films look good in black and white (and I agree, especially Alien, since the palette was so dark to begin with, re-rendering them in B&W actually reveals details in scenes I had not noticed before). However, I also want to mention how good Alien sounds. The communications between crew members of the Nostromo remind me of the NASA communications during the Apollo era. If you get a chance, listen to the exchange between Capt. Dallas (Tom Skerritt) and Brett and Parker (Harry Dean Stanton and Yaphet Kotto respectively) during the assessment of ship's damage after landing. When I first heard about the film Prometheus, I had high hopes for the prequel to Alien, which Prometheus is and yet is not. My expectations were so diminished by the initial reviews of the film in theaters that I just waited to see it on Blu-ray (and actually didn't see it until last summer. My Netflix queue is kind of long). Like many fans I was hoping to see the characters in Prometheus put all the elements in place for Alien to pick up. The blended film Derelict manages to point out how similar the two films and thus raises my estimation of Prometheus.

I recently watched Alien on a flight from Baltimore to Houston and several thoughts occurred to me. First was the idea that the xenomorph is a metaphor for disease, possibly cancer though AIDS seems to be a more appropriate fit. Second was the idea that the events of the film (and of the later film Prometheus) could be viewed as a reminder to obey safety regulations and safety protocols in the workplace. My wife is involved in promoting workplace safety and eliminating workplace hazards and thus I frequently look at activities from the point of assessing their level of safety or danger. In Alien, Ripley (Sigourney Weaver) enforces the 24-hour quarantine rule barring bringing an alien organism on the ship, only to have her efforts undercut by Ash (Ian Holm). Of course, without this plot element, there is no movie. In Prometheus, David (Michael Fassbender) is told not to touch the vases oozing a black goo, but while the rest of the landing party is distracted by a sand storm, he brings a vase back to the ship and deliberately infects a crew member. Once again, had he obeyed orders, the movie would have had to take a very different direction.

A third point (one of the similarities revealed by watching the two films in parallel) is that of the conflict of interest between the safety of the crew and the objectives of Weyland Industries (which at some point becomes the conglomerate Weyland-Yutani Corporation). In Prometheus, Peter Weyland (Guy Pearce) is a rich guy who wants to live forever and doesn't care how many other people have to die for him to reach his goal. In Alien, the company wants the xenomorph for research, perhaps to weaponize it. The company even establishes "Special Order 937" (Priority one: Insure return of organism for analysis. All other considerations secondary. Crew expendable.) The robots Ash and David act to carry out the wishes of the company and of Weyland. Perhaps these films should be viewed in the light of labor/management relations. While David is introduced as a robot in Prometheus, I confess that I did not realize Ash was a robot until he is disabled by Ripley, Parker, and Lambert (Veronica Cartwright). Every time I re-watch Alien, I look for clues that Ash is a robot and I just don't see any. He is the ship's science officer, so of course, he's a little odd.

Perhaps I have lost the thread of what I intended to say, but I'll wrap up by saying that if you get a chance to see Derelict, it is worth the investment. Job Willins has clearly achieved something. I look forward to his future work as a film editor.

Comment

1 Comment

Dallas Texas and John F. Kennedy

The Grassy Knoll

The Grassy Knoll

The Safety 2015 Meeting of the ASSE is taking place this week in Dallas, TX. It has given me the opportunity to walk around the downtown area of Dallas and of course, Dealey Plaza has to be on the list of places to see. While the assassination of JFK took place after I was born, it occurred early enough in my life that I cannot remember it (if I was even aware of it at the time). For the members of my parents' generation there is the conversational ingredient of "where were you when JFK was shot?" Personally for me, the two significant news dates are July 20, 1969 (humans first set foot on the moon, a challenge set by JFK [so glad my parents woke me up at 5:30AM to watch Neil Armstrong exit the LM on TV]) and September 11, 2001 (the day everything about the United States of America seemed to change [I was conducting an orientation to a statistical software package for my students]).

I might not have mentioned the Kennedy assassination, the Apollo moon landing, and the September 11th attacks in the same posting were it not for a common feature of these historical events, namely conspiracy theories. I had barely reached the grassy knoll when a gentleman approached me to deliver (unbidden) his theory of the assassination and sell me documentation of the theory. Even today people still believe the moon landings were faked (for my money, the most entertaining theory is put forth in the documentary Room 237). The number of conspiracy theories about 9/11 is astounding (my favorite was alluded to by the character Dobby in the Peep Show, "did you know that no one with an Apple computer died on 9/11?"). I understand the appeal of a conspiracy theory. They are fun. They are entertainment. Most people (or at a minimum, just me) like to think there is something bigger and unknown at work just below the surface. Just watch Blue Velvet (if you are old enough) to see what it is like to grow up in Everytown, USA and discover that things are definitely not as you thought. Alternatively watch almost any episode of the X-Files. As for me, I think Lee Harvey Oswald just got lucky, made a couple of difficult shots, and managed to kill Pres. John F. Kennedy.

1 Comment

Weekend art walk

Comment

Weekend art walk

There are many art, nature, and science museums within walking distance of us in Houston. On Sunday we decided to take in a few of the free exhibits and could not have been more pleased with what we found. At the Contemporary Arts Museum Houston the featured exhibit is Marilyn Minter: Pretty/Dirty. After seeing the exhibit we thought we would try to find the Rothko Chapel which we knew was in the neighborhood. Walking through the St. Thomas University campus, we happened upon one of the campus security personnel who told us about some other great free art exhibits on and near the campus. One we were unaware of was entitled "The Infinity Machine" and is displayed in the Byzantine Fresco Chapel. This was an amazing immersive visual and auditory experience featuring a rotating mobile of mirrors and the sound of the interaction of the solar wind with the earth's magnetic field. After "The Infinity Machine" we found the Rothko Chapel and after that had a little time to visit the Menil Collection. In particular we enjoyed the exhibit of the late work of Barnett Newman. Unfortunately we did not have enough time to see everything in the Menil Collection (perhaps another weekend), though we did take a few minutes to relax at the Menil Bistro before walking home.

Comment